Requirements
The basic technical requirement of any photograph taken for the purpose of survey is that it is correctly exposed and sharp of focus. Images should be recorded at the highest possible resolution that your camera allows with the finest quality setting if shooting in jpeg format.
Labelling
Each photograph should be annotated with the HB number / identifier external elevation (S) or internal room (G3) as recorded on the thumb-nail sketches of each floor. Poorly labelled photographs are worthless.
Cameras
For survey purposes we require you to use a digital camera with interchangeable lenses. One advantage of using a digital camera is that the images can be reviewed before leaving the building making sure that all images have been correctly captured. A minimum of an 18MP sensor is required in order to capture high quality images with adequate details. Date indicators are required to be set correctly for digital images as you may be required to confirm that the camera date is accurate for each record - this date will appear in the ‘Exif’ data automatically attached to each image, the date should be set in the format day -month- year.
Tripod
A suitable tripod will at times be necessary for photographing large interiors. This will allow you capture the image in natural light in lower ISO/ASA allowing the recording of much more detail than when using a limited on-camera flash. Using a remote with a tripod is also advised for long exposures to avoid any shake created by manually depressing the shutter release button. Camera shake can occur at any speed and if a tripod is not accessible you should always adopt a stable stance with feet shoulder width apart with the camera held in both hands. The shutter speed will normally be displayed on the camera. Some cameras will warn when camera shake is likely, slower shutter speeds can be tried by bracing yourself and the camera against a support such as a column, door jamb, wall etc.
Flash
Most cameras have an integral flash unit. This will be adequate for recording details up to 3m away. They are not adequate for photographing large interiors - see above and the need for a tripod. A hot shoe mounted flash unit or a slave flash unit will allow for the flash to be redirected to create diffused light and minimise harsh shadows which can obscure details.
Exposure
Photographs are only of value if correctly exposed so that the detail can be seen and the subject evaluated. For record purposes the best type of weather is a bright day where a high canopy of light cloud forms a uniform non-directional light. Unfortunately, we are not always able to choose the survey weather and difficult conditions need to be understood and compensated for. When there is direct sunlight there will always be at least one elevation where the sun will be shining directly at the camera lens, and the elevation you are trying to record will be in shadow. If sunlight shines directly into the lens it will cause ‘flare’. To prevent this, shade the lens with your hand or a lens hood. In these instances, if you use the auto exposure setting, it is likely to result in the shaded elevation being substantially underexposed and little or no detail will be recorded. There are two ways to overcome this:
- walk close to the shaded elevation and take a manual exposure reading or
- lock the exposure value taken.
Take an ‘exposure reading’ from the shaded elevation.
Check/read the camera’s manual to see how your camera can be used in this way.
Deliberately overriding the cameras automatic exposure setting can be useful in other situations. On ‘Auto’ mode the camera takes several exposure readings from parts of the whole scene and then uses an average exposure. This will be suitable for most scenes with average highlights and shadows. As we have seen earlier this can lead to underexposure when shooting towards the sun.
Another instance that will lead to an underexposed photograph, is where you are photographing a very light coloured building illuminated by strong sunlight falling directly onto it. The auto exposure system will tend to produce an exposure that will record the building as light grey and you will have to override the auto setting by either taking a reading from an ‘average’ part of the scene or deliberately overexposing by up to a whole stop. If in doubt bracket some exposures.
Photographs for publication
For publication purposes you should take a photograph of the building that captures its best architectural features.
Every attempt should be made to furnish views of interiors, permission to photograph should be sought if it is necessary to enter a building and/or its grounds.
Photographing a building for the Second Survey
The purpose of the photographic survey is to provide a comprehensive, high quality visual record of the building and its setting at a moment in time. These images underpin HED’s day to day work in spatial planning and enforcement and are a significant ongoing contribution to the Historic Environment Record of NI (HERoNI). Records that may seem quite ordinary now, can gain greater significance for future generations. HED has many photographs taken 30 – 40 years ago that are the only record of a particular building or building type. Structures should not be photographed in isolation.
The building in its setting
The photographic record should include images of the building in its setting. The setting of a listed building can be defined as the immediate and extended environment that is part of, or contributes to, its significance and distinctive character.
It is up to the Contractor to identify those images which best describe the setting of a building or structure. These should always include the building in its immediate environment – for example:
- the building and its immediate neighbours and longer views up and down the street, additional photographs may be long views towards the building (for example a vernacular building in the wider landscape) or an urban skyline
- views from the building, particularly where they are part of an intentional design – for example within a designed landscape – must also be considered
- the spaces and relationships between groups of buildings, particularly where there is, or was, a functional relationship (mill, factory, farmyard), are also important
See HED’s publication ‘Guidance on Setting and the Historic Environment’ for further information.
If the setting of a building or structure is extensive, then the number of images and points of view should reflect this. Setting is not confined to views where the building is visible in juxtaposition with other buildings or landscape – there may be occasions where, for example, the approach to a building (where the building itself is not seen) contributes to its significance. Buildings features should be recorded in as much detail as possible such.
General exterior photographs

Elevation photographs
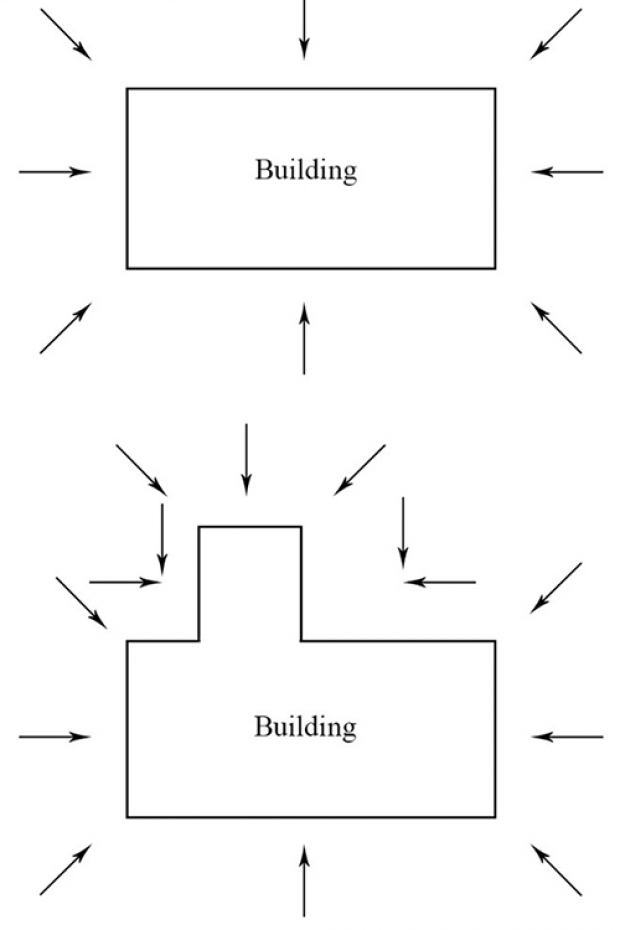
These will be taken at right angles to the elevations. You should capture the whole elevation in a single photograph if this viewpoint is possible. If not, then several photographs should be taken to record the whole facade. In a large building, it may be necessary to use both approaches to record sufficient detail.
In a street situation, an oblique view may be the only way that the full height and width of a building can be captured as a single picture.
External details and features
Windows, doors and any other details such as stone carvings, date stones or decorative RW hoppers should be recorded separately.
Gates, gate screens, garden features such as balustrading and outbuildings should be recorded.
Outbuilding and other separate buildings should be fully recorded if they are likely to be included in the listing.
Internal rooms

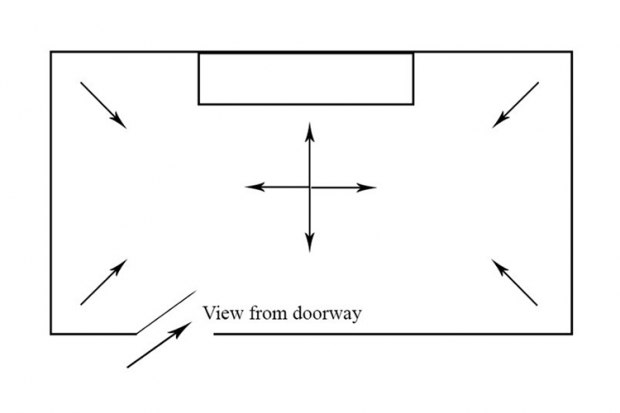
Use natural light and a tripod where possible but the small flash on most cameras will usually be adequate for small rooms and recording details. When using flash take the photograph at an angle to prevent the flash bouncing off the feature and appearing in the photograph.
When recording interiors, permission should always be obtained from the owner advising that photos are being recorded on behalf of DfC Historic Environment Division. Interior images will not be used in publications or released to the public without the owner’s prior consent.
Roof structure
Make every effort to record and photograph the roof structure, especially for vernacular buildings. If the roof spaces are not accessible, effort should be made to take photographs from hatch openings using a flashgun
Extent of listing
All buildings/ structures that are to be included in the Extent of Listing should be fully photographed.
Photographing stained glass windows
In most instances the camera is used to record light that has been reflected off the subject back to the camera. This is not the situation for a stained-glass window where the camera is used to record the light passing through the glass.
An exposure reading must be taken of the light passing through the window and the photo deliberately underexposed by about 1.5 stops to capture the true colour of the glass. This means that if the camera gives a spot reading of 30th sec at f4 then the best exposure would be 30th sec at between f5.6 and f8. This can be adjusted manually; most cameras have a method for deliberately under or over exposing.
Direct Flash should never be used to photograph stained glass windows.
Image quality
Check your photographs on the camera before you leave the building. If in doubt take several photos of the same subject at different exposures (bracketing).
General
The extent of the photographic record should be tailored to the building. Note: if a building has little or no historic interior then take sufficient photographs to record this fact. Your survey needs to be comprehensive, including images of alterations, extensions etc. and any development in the immediate setting. These will be valuable when considering whether a building/structure meets the Criteria for Listing.
Guidelines about people and car number plates
GDPR
When taking photographs, generally avoid including people, ask them to stand to the side.
Children, or young people under 18 should never be photographed during any building photographic record.
Photographing car number plates should also be avoided wherever possible.
Other images to be captured and entered
Often owners will have photographs, paintings or other documents that are of great interest in relation to the building. You should record these. Where the photograph or painting is in a glass frame, use natural lighting (if possible) and photograph it at a slight angle to avoid reflections.
Building plans and complex site plans - these can be digitised on a flat-bed scanner or by photographing at the same resolution as the digital photographs.
Further reading
Buchanan, T, Photographing Historic Buildings, HMSO, 1983.
Cole, Steve, Photographing Historic Buildings (2017)
Schulz, Adrian, Architectural Photography: Composition, Capture, and Digital Image Processing (2015, 3rd Edition)

